


- Put the duck directly on the oven rack, per Eileen Yin-Fei Lo in Mastering the Art of Chinese Cooking. I have a self-cleaning oven but the thought of scrubbing the oven racks made me veer away from this approach. I am my own clean-up crew.
- Hang the duck on meat hooks and suspend it from one of the oven racks. My oven is large but didn’t have the height for that!
- Put the duck on a roasting rack in a roasting pan, which is what most other recipes recommend. This seemed most feasible but how can I do it strategically?
Regardless of how the duck was placed in the oven, a pan of water should be put underneath to catch dripping fat. If there wasn’t any water, the fat would cause a royal mess in the oven and quite a lot of potential smoke too.
Where to put the duck in the oven? I positioned the oven rack so that the duck would sit in the middle of the oven. Then I poured about ¼ inch of water into the roasting pan. The roasting rack I made sure sat above the rim of the roasting pan so as to have more heat circulation all around the duck
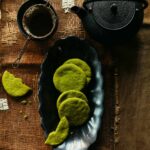
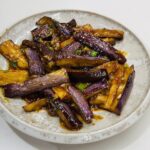
What temperature to roast the duck? I decided on starting the duck at high heat and then reducing the heat to a moderate level. The logic is give the skin a head start with crisping and then to slowly roast the fat off from underneath the skin. So I roasted at 475F for 15 minutes then 70 minutes at 350F. The house filled with wonderful duck roastiness. Rory and I frequently peered through the oven window to check on the duck’s progress. It hissed a lot at the beginning but then settled into a slow steady roast. The result is the duck at the top of the page. The skin was crisp and stayed that way for a good 30 minutes or so, after it had deflated a touch. The above photo reflects a half hour out of the oven.
The major test was when I cut the duck up. (Do remove the chopstick before attacking the duck with a knife.) What did I see? The skin had indeed separated from the flesh! In the close up photo of the leg below, that skin was like edible fatty paper as there was hardly any visible fat left! Shazam. While the skin was still in its prime crispness and the meat warm, we dove in with thinly sliced scallion, hoisin sauce, and Chinese steamed rolls that I had thawed.

The skin was terrifically crisp, not fatty but rich tasting. The flesh was moist but not overly so, but not dry either by any means. All in all, the duck was a major success. We ate everything but the bones. This was my first homemade Peking duck and I don’t think it will be the last.
Related homemade Peking duck links:
- How to blow up a duck
- How to scald and give the duck a tan
- Chinese steamed rolls (on Asiandumplingtips.com)
- Fragrant and crispy duck recipe (deep-fried Sichuan alternative to Peking duck)
- Fragrant and very crispy duck recipe (another version of the deep-fried duck)


Eric Gower
This looks deliriously good!
Jai
I've never had Peking duck before. Now, I have a quest. Find Peking duck in Dallas. It sounds like all your hard work paid off. I wonder how many home cooks would attempt this recipe?
sunflower
Well done! Looks delicious I am tempted to get the duck out of the freezer and make something similar.
Andrea Nguyen
Glad you're tantalized. Hope to tempt you to try it out!
Tanya
Hi Andrea,
I love your book and your webpage! I haven't had a chance to check out the dumpling book yet, but I will soon as I love dumplings!
I just wanted to contribute a bit of info on the peking duck that perhaps you can check out next time. Martha had a guest on her show for Lunar New Year and the lady was doing peking duck and she actually used the poultry standing roaster you can probably get for like 10 dollars. it holds the birds upright so that your whole bird gets even air circulation. Maybe you can give that a try next time? Please let us know if you do attempt!
Keep up the great work!
Tanya
TripleScoop
Congrats on a successful peking duck!!
Andrea Nguyen
Thanks for the tip, Tanya!
Beaulotus
Arrgh that is alot of work but what a gorgeous duck!!!
I'm salivating...
mbt online
That was my thought,too.
Cash gifting programs
Can see the fat trapped beneath the skin, looks a bit over roasted but crispy 🙂 Never favored duck meat that much but like the way the Japanese prepare their duck meat.
Red Bottom shoes
Every dog has his day.